Friday, 25 November 2011

Through The Window

This post is almost a word for word copy of the post that will have been revealed this morning over at the International Quilt Challenge blog and I have reproduced it here to save me re-writing a separate post for this blog (lazy mare!).  I think the photos should open if not please pop across to the Challenge blog for a better view.  I am trying to save time as I have a busy week coming up and am writing this post in advance.

As I said in my earlier post I was becoming fascinated with the quality of light that comes through a stained glass window and I particularly became fascinated with the cut through process that I had been playing with.  After I had made a piece 10" square for my Journal Quilt I have gone on to make an A3 sized piece for this challenge.  It is not the only piece I have made, more of that in a minute.


As you can see I didn't actually take this particular technique any further, mostly because I didn't have the time but I may well play with it some more when time allows.  You may notice that the quilt I made for the Olympics had a grey binding whereas I used black for this.  I wasn't sure whether the black would be too dark but I think it works.

I said in my previous post that I wanted to experiment with sheers and I have had a great time doing just that.  I took a selection of neutral organzas, silks and nylon sheers and used fabric paints tostamp and make monoprints on their surfaces.  I kept the monoprints neutral in tones of grey and was a bit worried at first that they might be too light to show up.  Sadly I was so busy working I didn't take any photos of the process.

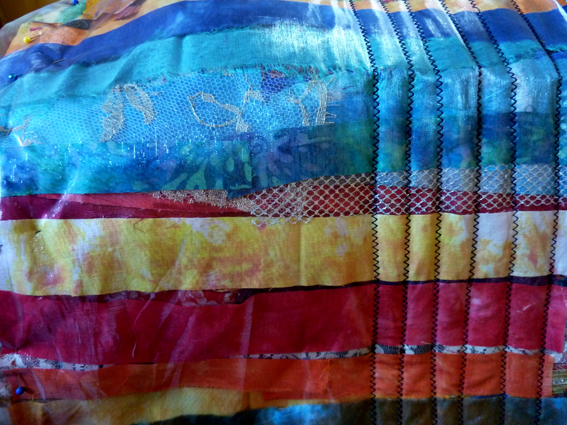
The next step was to use silk paints to add colour to the pieces of fabric.  I decided on silk paint as I didn't have a lot of time, again.  Once the fabrics were all prepared I started to cut and piece them using a pojagi style of seam.  This is the result:


The photograph above was taken indoors with the piece laying on the top of my sewing table.  It is very slightly smaller than A3 size.  I then took further photographs outside.


After photographing the piece hanging from our driftwood I couldn't resist hanging the 'window' in the lilac tree where the sun was shining through this morning.


I have made a lot of mistakes with the stitching in this technique and a certain amount of drifting has occurred but I am so delighted with the way this has turned out.  The surface marks are really exciting me and I am really happy with my interpretation of 'Through The Window'.  I am quite tempted though to leave it out in the garden to let the sun shine through and see how it ages.


Sunday, 20 November 2011

Been busy

I seem to have been very busy but I don't have much to show you as I have been working towards a challenge and the reveal isn't until next Friday so I have to contain myself.  However, following on from my last post I have made one of the stained glass window quilts for the 2012 Olympics competitors.


The quilt is A3 size and has lots of scraps of fabric of all sorts of texture in it to suggest the different qualities of light.  


The reverse of the quilt is the cross of St George, the English flag, although it's a little bit skew.  I just need to attach a label and hopefully make another before the December deadline. 

I can show you just a little taster of the project I have been working on for the International Quilt Challenge Group.


I have had great fun working on this, despite a little bad language when the machine ate the corner of the finished article! Grrrrrr!  Panic not, I was able to rescue it. Phew!

Some time ago my friend's elderly aunt passed away and when her house was cleared a part completed hexagon quilt with pieces of fabric was found with all its accompanying papers.  The quilt has now been completed and I was able to photograph it.


Isn't it a beautiful quilt?  Hopefully you will be able to click and zoom to see the fabrics that have been used.  Some of the fabrics are thought to be almost 100 years old and dates on the papers go back to 1915.  The papers were parts of letters and envelopes and some printed material.  I felt privileged to be able to look closely at and not least, handle such an old quilt and to examine these fabrics up close.  It is wonderful to see vintage quilts at the Quilt Museum but even more amazing to be able to handle a quilt that has survived a 100 years.

Finally, I'll leave you with a piccy of a gangster who found his way into my house this week ;-)


Al Capone, eat your heart out! LOL

Have a great week!

Monday, 7 November 2011

Windows, Chilford and Gorgeousness!


I have been having a further play with the reverse applique pieces I am working on for the International Quilt Challenge and made the small piece above on a sheer base fabric and it turned out much less bulky than the first piece I made.  I decided to bind the edge and used a black fabric to represent the lead in stained glass but I feel it is a bit heavy.


When it came to binding the 10"x10" square I decided on a grey binding and I prefer that to the heavier black.  I've put together two more A3 sized 'windows' and am going to continue working with them as I am enjoying this process.  One of them will become a Pennant for the Olympics.

I haven't started working with the sheer version yet, I had the idea of printing onto the fabrics and then painting with silk paints so hopefully I will find some time for that tomorrow in between the dusting and hoovering!

On Saturday I had a lovely day out at the Grosvenor Autumn Quilt Show at Chilford Hall.  I hadn't been to one of these Grosvenor shows before and I was pleasantly surprised, not least by the venue.  Chilford Hall is in a pretty rural location and its grounds are lovely too.  Saturday was  a foggy day so it was a bit chilly for wandering around and the light was poor for photos but we were very impressed by the sculptures and statues dotted about.  Hopefully if I come back for the Spring Show the light will be better and I can get some photos of the grounds.

The show was staged in two large halls with timbered rooves and painted ceilings and in another large room that was strung with tiny 'christmassy' lights.  There were some wonderful exhibits and just enough traders to keep us interested.


Just part of the beautiful exhibition space.

Susan Briscoe, South West Quilters, Stitch Witches, Frieda Oxenham and The Blue Tulips Textile Art Group were just a few of the exhibitors whose work I admired.


This beautiful piece caught my eye with its wonderful use of silks and bead embellishments.  It is part of Frieda Oxenham's Colour-Quilt-Collage exhibition and is called Foxfires, a name used to describe the Aurora Borealis.


A detail from another of Frieda's pieces (I apologise for the poor quality of the images, the light was terrible!)


Isn't this fabulous?  So much colour and energy!


Earthly Pleasures inspired by collage.


Marie Studholme Journal Quilts from 2009 inspired by Frieda's collection of postcards about Marie Studholme (1872-1930) who was an English actress and singer.  I particularly liked this piece for the way Frieda had mounted it onto tweed and used vintage fabrics, clothing and buttons. 


This piece above is La Rue du Soleil by Maryel Cowell who is a member of Stitch Witches.  This group had many beautiful imaginative pieces on show.


Adjacent to the previous piece was this piece above entitled Mont St Michel by Terry Donaldson. 


This stunning quilt is by Pam Bono who lives in Athens Georgia in the USA.  There were many more of her impressive quilts on display and you can find out more about them at pamsclub.com.

This piece fascinated me.  It is titled 'Beyond The Naked Eye' and is by Eva Thomas a member of Blue Tulips Textile Art Group.

No visit to a quilt show would be complete without a bit of shopping and I was fairly good stitcking reasonably close to my shopping list.


I couldn't resist the book by Bethan Ash which hadn't been on my list but it's images were so inspiring and I'm really pleased that I bought it.  The fabrics are destined for some more stained glass window play.

When I got home my lovely DH had been to the post office for me to collect a special parcel that had winged its way all the way from downunder: Downunderdale, to be precise who trades as The Thread Studio in Australia.


Above is part of the hoard, gorgeous mixed embroidery threads, dyed emu feathers, tangle tuff for texture and the most beautiful turquoise stone ready drilled for a necklace or to use as an embellishment.


Look at these wonderful embroidery threads for machine and hand embroidery and some very unusual silk fibres that will be fun to play with.  Why did I receive this wonderful parcel?  I was the lucky winner of a giveaway on the Thread Studio Facebook page when Dale reached 900 'likes'.  If you would like the chance to win a similar parcel pop onto Facebook and 'like' The Thread Studio but be quick the next giveaway is at 100 likes.  Not long to go!


Friday, 28 October 2011

Through The Window

I think I mentioned before that I have recently joined a group that calls itself The International Quilt Challenge group.  Our second challenge which is due for completion and reveal on 25 November is titled 'Through The Window' and I have been giving it a lot of thought over the past few weeks.  My immediate, and probably obvious, first thought was 'Through the round window.....' as in Play School.

Similar to the last challenge, as soon as you start thinking about windows you see them everywhere (well, they are aren't they?) and you start thinking about every interpretation of 'through' and 'window'.  A window to the past, a window through time, windows of the soul, window of opportunity, looking in through the window, looking out through the window.  Window - an opening allowing a connection between one space and another, light pours in through the window, a surface that reflects light and its surroundings. A window can be many shapes; it can be clear, frosted, reinforced, mottled, distorted, etched, of many colours.

An abstract painting that I made on the subject of looking back through time which was made with a window cut from a photograph incorporated into layers of torn watercolour paper with crayon marks added and manipulated in Photoshop.

Inevitably, and to cut a long story short for the moment, my thoughts turned to stained glass windows, which I love for the light that they allow to pass into the room.  The window above is part of the stained glass in Chester Cathedral and I have used part of it previously in a watercolour sketch (still need to find that).  

In our local parish church we have a beautiful stained glass window by John Hayward entitles Christ Walks on the Water.  With the Quilt Artist's eye that I now have I can see several ways of interpreting this window.


Over the years, and particularly in the past these stained glass windows were a way through which people who could not read learned the Bible stories.  Over the years stained glass windows have become more abstract and convey their meaning in other ways.  

As a way of finding my way into this challenge I thought I would play about with cut through fabrics, especially after reading an item by Naomi Renouf in the June 2010 issue of Workshop on the Web   that I found on my computer.


I've started by layering scraps of fabrics onto a background and securing them under a layer of organza with stitching running at right angles to the run of the fabrics.  Subsequently I cut through the channels deciding as I went along how far down to cut.

The next step is to machine at right angles to the first lines of stitch opening up and catching down each cut layer to reveal what lies beneath. (detail above)


I am quite pleased with the result so far.  I feel it has some of the movement in the window in St Wulfram's church and I am excited to work it on a larger scale.  

I have been trying to decide whether this would work with a more transparent feel to it so that light can actually shine through and I've made a further piece but have not achieved that transparnecy yet.  Once you start thinking and looking there are a lot of ways of interpreting (light) through the window and I'm glad I've got a few more weeks to work on this project.

I have been trying to track down a link to a programme that brought home to me the power of stained glass some time ago and I can't find it.  I think it was  a clip of (?Rolf Harris/Michael Palin?) in a chapel with stained glass windows designed I think by Chagall or maybe Matisse.  My overriding memory is of the presenter standing in the chapel with light from the window pouring over his fingers like water.  For some reason the image took my breath away and brought a lump to my throat.  Such is the power of light through a window.


Tuesday, 25 October 2011

Roman Blinds 2

Thank you for your comments yesterday, I still have a few to reply to by email but as ever I do appreciate you taking the time to comment.  As I've been busy trying out arrangements today i thought I'd get on and show you what I've been doing.

Yestrday evening I trimmed all the blocks to 8" squares.  Sadly I had my opinion that I am not a traditional quilter reinforced as one set was slightly wonky so if anyone has a serious perfection gene please look away ;-)


As you can see I cut off the timiest slivers from each side to square the blocks up.  Ideally the 45 degree angle should lay along the diagonal stitch line but I was adrift on a few.

Having trimmed all the squares up I then had a play with potential layouts.

First of all a basic layout (excuse the untidy and scruffy bedroom)


This keeps the 7 designs in their straight lines.  Did you spot the deliberate mistake How did I miss that!

Layout 2, still in design lines but with what I call windmills.


Layout 3, diamonds.


Layout 4, Flying Geese.


Layout 5, a central star with blocks still in a uniform design arrangement.


Layout 6, central star with the blocks mixed up a bit.


And finally, layout 7 with the blocks mixed up and a small adjustment made to the arrangement compared to layout 6.


I don't think there's a lot to choose between 6 and 7.  I don't like layout 1 or 4 but I do like 5 and 7.  Because there are 6 rows and 7 designs of block you could play forever to balance the blocks so that you don't get obvious duplicates throughout.

I have pinned together in rows the blocks from layout 7 but I am not going to sew them yet as I have to decide whether to add sashing anywhere and I also need to select fabrics for borders to make the quilt big enough for a bed.  I may yet change my mind about the layout too!

Monday, 24 October 2011

Roman Blinds

A couple of weeks ago at my monthly quilting group Trudi, who blogs as 'Quilting Prolifically' gave a workshop on piecing Roman Stripes (not Roman Blinds as I keep calling them!).  Probably for the first time ever I have actually come home and finished off the project and made something with the blocks. 

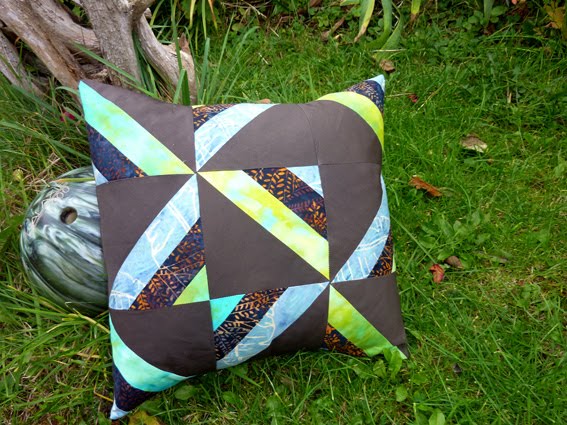
This cushion, which is a bit overstuffed until I can get the proper pad for it, is made with my Roman Stripes made from 2 commercial fabrics and my hand dyed greeny fabric and my hand dyed background fabric.  As I ended up with 9 blocks I played about with them until I had an arrangement I liked.

The evening must have hit my inspired button as I couldn't wait to have a play with a collection of batik strips that I had bought last year and which were reclining in my drawer begging to be used.  The first step was to sort the 2 and a half inch strips into group of light medium and dark and then to select groups of three to join together along their length.


Once you have joined each set of three strips you need to cut a 'backing' strip from your background fabric, the width and length of the joined strips.  These two pieces are then sewn together with right sides facing. (Sorry I forgot to photograph that step).  This is my background fabric:


Once the fabric sandwich is made the fun starts!


Take your quilting ruler and line the 45 degree line up along the bottom edge or line of stitching of your block. (The arrow above shows that I lined mine up with my stitch line).  Once you're sure it's straight cut along the edge and discard the end piece.


Next slide the ruler up so that the 45 degree line lays along the top edge or top line of stitch and cut again.


You will end up with a triangle which opens out to reveal the backinground fabric and magically makes a square!

How good is that?!  Continue along the strip and every subsequent strip until all your squares are cut and you are left with some excitingly shaped scraps!  More photos to come!

I have currently got 42 blocks to play with and because of the width of strip I used my blocks will finish at about 7.5 inches so I have enough for a top which I will probably add borders to to make a bed quilt.  At the moment I am trying to decide whether I could possibly make these up in a Quilt As You Go fashion.  Any advice anyone?

Posted by Picasa